
Chapter 1: Introduction to Point-of-Care Ultrasound (POCUS)
1.1 Definition and Scope of POCUS
Point-of-Care Ultrasound (POCUS) refers to the use of portable ultrasound at the patient's bedside for diagnostic, procedural, or monitoring purposes. It is performed and interpreted by the same clinician in real-time, allowing rapid clinical decision-making.
Clinical Significance:
-
Enhances diagnostic accuracy
-
Reduces diagnostic time
-
Guides emergency and routine procedures
-
Facilitates patient management in resource-limited settings
COMMON TERMS USED IN POCUS
|
Term |
Definition |
Illustration |
|
Echogenic |
Produces echoes and appears bright on the ultrasound image. |
|
|
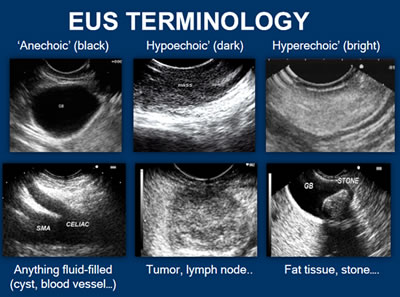
Anechoic |
Does not produce echoes; appears black (e.g., fluid). |
check the above photo |
|
Hypoechoic |
Fewer echoes; appears darker than surrounding tissue. |
check the above photo |
|
Hyperechoic |
More echoes; appears brighter than surrounding tissue. |
check the above photo |
|
Isoechoic |
Echo pattern similar to surrounding tissue. |
|
|
Heterogeneous |
Mixed or varied echotexture. |
|
|
Homogeneous |
Uniform echotexture across tissue. |
check above photo |
|
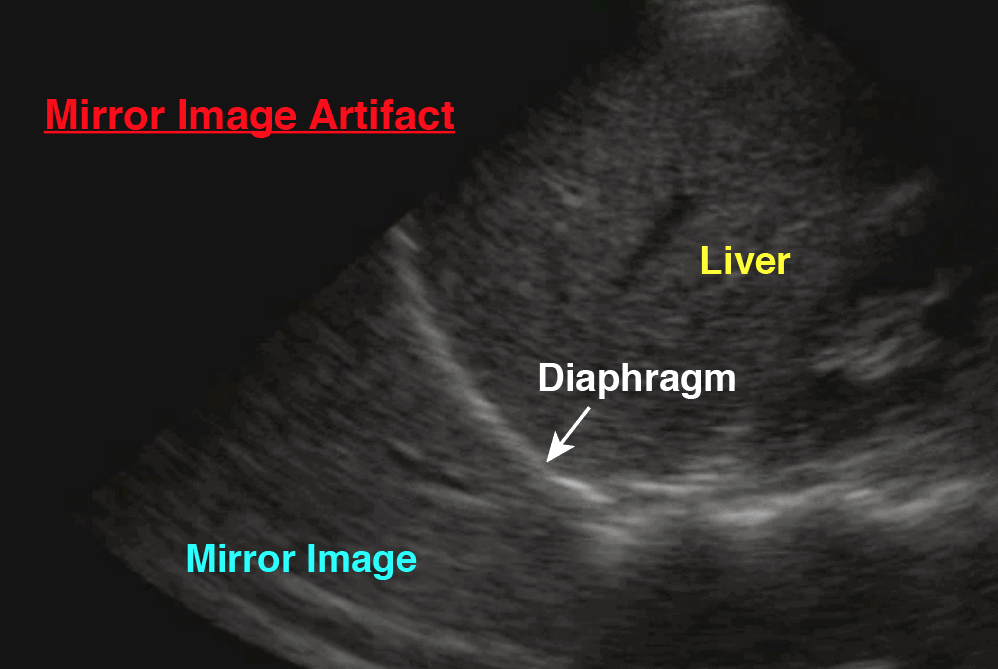
Artifacts |
Image distortions caused by ultrasound wave behavior. |
mirror artifacts |
|
Reverberation |
Multiple, repeating echoes caused by strong reflectors. |
Reverberation artifacts |
|
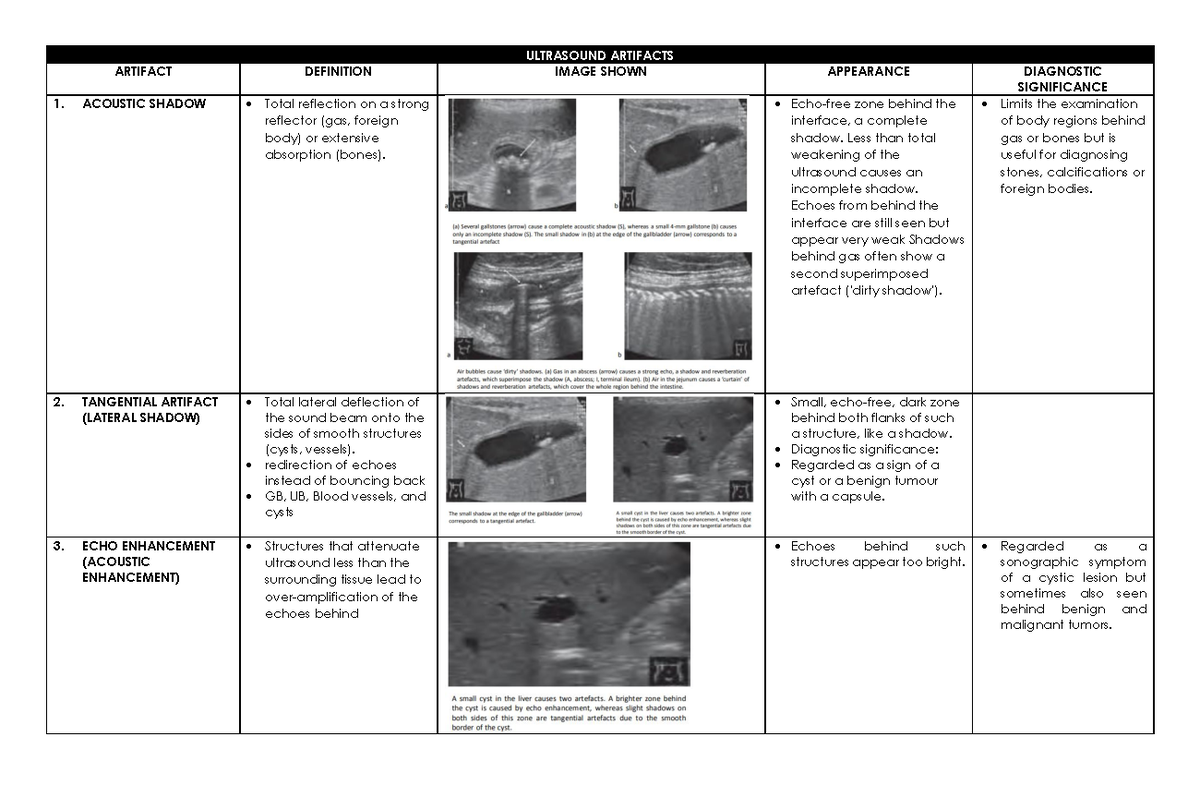
Shadowing |
Dark area behind dense structures blocking the sound wave. |
posterior shadowing |
|
Posterior Enhancement |
Bright area behind fluid-filled structures due to low attenuation. |
|
|
Gain |
Controls the overall image brightness. |
|
|
Depth |
Determines how deep the image displays tissue. |
|
|
Focus |
Adjusts the focal zone for maximum resolution at a certain depth. |
|
|
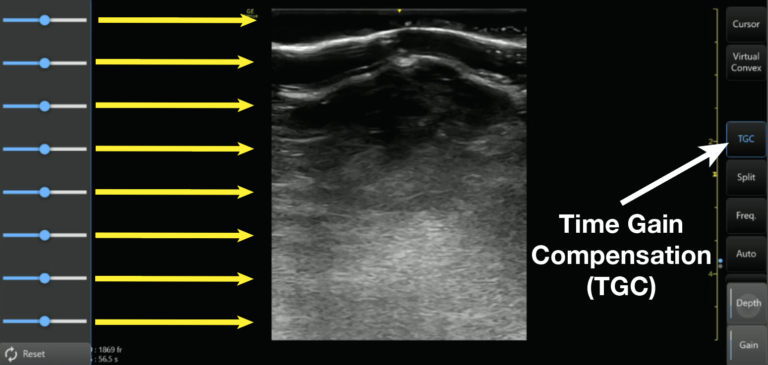
TGC (Time Gain Compensation) |
Adjusts brightness at various depths individually. |
|
|
Transducer (Probe) |
Emits and receives ultrasound waves. |
|
|
Longitudinal View |
Image along the long axis of the body or organ. |
|
|
Transverse View |
Image across the short axis of the body or organ. |
Normal Transverse View Of The Abdominal Aorta |
|
Sagittal Plane |
Vertical plane dividing body into left and right. |
|
|
Coronal Plane |
Vertical plane dividing body into anterior and posterior. |
|
|
Axial Plane |
Horizontal plane dividing body into superior and inferior. |
|
|
Cystic |
Fluid-filled, usually anechoic structure. |
|
|
Solid |
Tissue-filled, echogenic or hypoechoic. |
SOLID MASS
|
|
FAST |
Focused Assessment with Sonography for Trauma. |
|
|
E-FAST |
Extended FAST including lung imaging. |
|
|
B-mode |
2D grayscale ultrasound imaging (Brightness mode). |
|
|
M-mode |
Motion mode – used in cardiac imaging. |
|
|
Doppler |
Measures blood flow using sound waves. |
|
|
POCUS |
Point-of-care ultrasound done at bedside by clinician. |
|




![Axial views of the fetal head [12]. (a ...](data:image/jpeg;base64,/9j/4AAQSkZJRgABAQAAAQABAAD/2wCEAAkGBxMTEhUSEhMWFhUXFxcaGBgYGRgbHhoYGBUaGh0dHh8aHSggGB8lHRgdITEiJSorLi4uGB8zODMtNygtLi0BCgoKDg0OFQ8PFSsZFRkrKysrKysrKysrKzcrKy0rNy0uLSsrLS03Kzc3LSsrKysrLTcrKysrKysrLSsrKysrK//AABEIAM8A9AMBIgACEQEDEQH/xAAcAAACAgMBAQAAAAAAAAAAAAAFBgQHAAIDAQj/xABWEAACAgAEAgYFBQgMDAYDAAABAgMRAAQSIQUxBhMiQVFhBzJxgZEUI6GxwUJSYnOztNHwFSQlMzVDU3J0gpLhCBY2RFRkk6Ky0tPxJjSjwuLjg4TD/8QAFwEBAQEBAAAAAAAAAAAAAAAAAAECA//EABsRAQEBAQADAQAAAAAAAAAAAAARASESQVEx/9oADAMBAAIRAxEAPwC8cZjMZgMxhxGz2dSJdbmhYAoEksxoAAbkkmqGBObz01apGGWiOkLsGlZ3cKoqiqkkqAAGJLDlgDkkoUWxAHiSBiD+zuW7pkb+Ydf/AA3hZ4fA0svXZfKJJG0aMuYzUkmtywvsoUbQAK3IU33d+GHKQ5lgDM6xG/UhAYAVyLSLub32A5DzOA6/s1Dzt68TG/8Ay4wcdy1118YPgXVT8GIOPP2NPauea25HUo07VahVC+e4O+IOb4RmajWLOSVq+cMiwvqQqb0/NbMDRHdzvuwB5XBFjceIxthFznR7NQya8oFc6GOvWIH13sCiJ1DgjYEoCK3Pfgnw7pC6u8eYFaCna0lWQOSF61TsLIIEiWhKtyrcGfGY8U49wGYzGYzAZha6f9Kf2NypzXVdbTomjXo9a970t4eGGXFb+n/+CT+Oi+s4ABF6c5GUuvCpCgu2ExKiudkQVj2D07Bv8wr/APYv/wDljn0UV1m4fFeemk6rLsQhSPKJC6KTYA+cpCQb3LA8rvFN5dGB0EEMpog8wRzBHjgL5y/pi1f5nX/5x/0sFMn6SS4s5XSPxtn8nirei3RZ5Tbmud7jYeJw4/srBlF0xU8niV2HsBxuM07Zbpiz+rlifY9/UmJY6Qv35dgfNj/y4rP/ABpmkbtEEewDy27sEG4i6rzP0YTCn/8AZ1v5Hfw1/wDxxxbpK4/zZv7X/wAcVvJxh79Yn244DpCwPM+039mLMSrIm6WyAX8lJ8uso/SmBOa9JRTnk2/2lf8AswuZbpfKDQYV5gc/fgonE4ZhU0Zv75aX4gc8TxxayT0ugc8p/wCt/wDXjMp6XRIwRcnvz/fv/rxHl6LRSglCG5mluwK77G/uxC4V0WMUgdVsciT8dh7ueHiU7r0zar+Tj2db8fuMcI+nwJoZc34F6+nRhP4lxR8nmfvkFg2AefMCsLHEOJK8skkRoE2b7ieXnhMKvngueOYhSYx6C2rslrrS5XnQu6v34zAn0bZgtw2BnPaPW33cp5B9mMxhTQxwt8e6UfJGMk0YGTC02YV9RWXXpCNGFsAnbVex5gc8MhxW3F8/kZGlaNzl5FiklYFmhZ5WbSuqEkF6eySyEWwo2TRRfhubbMTCSJopW0qXmUrJHlwRqEMYD9qRlbdxzGkkVpGGDh3BIotwNT2S0rhS7MTZJah39w22HhhR6OdEc7kir5fMpIjLqmhmj6oyylfXaRA5Rr7wtnTTaj2sEMh08QvJHmMtmcu0X76XQMiCiQ5ZCSsZAJEjKqmjRsHAOAGMBwlZzpZ8qDJw+ZQoJDT9liCKsRoQQ3P122BrstvUN8iGIaRpXagLaWQ8u8Lq0qTvyA54Cwbx7ivkygUho3ljYciskgF1QJUtpcDwYEeWJ2V6SywBRm6kjshswo06RZOqVBsqhebg0KsgA7A54DdIej0eaALM6SIG0OhIosPugCNaWASh2OkXeC6sDuN8bYBP6J8XMc0nD5T85FbIKoGMsSunu0lCpA+57S2dBOHDCt0qyVz5eRaUqs2jYDVOpikjUnnukcq1uDqO2wwx5PMrIiyL6rKGHsIvAdsZjMZgMxW/p+/go/jovrOLIxW/p/8A4Jb8dF9ZwHz1Fx3MqixJmZ1Ra0ossgUEGxShqFHfbBbo7pLmWcmiSWYkksx33Jskk88LMY3xJWYnbkPLFxNPXE+mLN2I1UIO6zgVBnjdse/leA+XkUEFhYsWPEWL+jDZluOZGpLypkLG0+ajjA0mwpKyNpHIFlG/ep3u1Im8M4kjbE6OfNidsG58wioKfUD9GAnA85lFOoxMagaNQY1ppKOiZ/nOyx2JUXW9M1DBTOZ2DrS5CFCrjSqR2CXYqdJOmwmkXvuDt34pAXOcYPIeffge3Ezv9t4NZnjOS0KVy+lkMYI6tGLjS+rcyVVgAuQSNY2uiImZ45lZc1NO0ZMZVmCtGhJZ86H0hQ+m+pYqTq2omjiUjhlOKgevQHj/AN8Gcrnk52PKyMe5PjeQA7OUIQqislKdWk2bJftczvQO9HYDELh/EcpGUVkchQA4MaqznqlQtqElx2QxI3G98+VzSCH7MNG1ow59314P5Lpkr9mav5xJB958PLCN0n4ojiPqlK6S99lVBDadNBWI2o/EewC8ozNtqr2bn4YUi0eN5WPORBkNOAaojf2UN/Zios5qgmYG7U73hy4RxR4So19Yt70N0PddcrwO6c5Eu/XhaLm2586w0XZ6LZVk4Xl3UUD1vffKeQHc+eMxG9Di6eD5YHY3P+dS4zGGjoReEnp4rNHm1RDI6xZZ1QKXqp23CUbOzd24FYd8DcyoSdZPv16sn3lkv36h7WwAvKdGI4o9OUnny6miCjKy8hRCTI6KK20qAPAXvhX6a8Ez8kccmY+TzJlmaYNArxTaVjcHSsjPG5tlfSSAeqqm1UHTOZF4g0mVstanqSwEbgbFRq2iJF7rQurvBDK5oSLqCle0wo1doxU8iRzB78BSz8bykvzXEYvnEDMJRHpBA7w8bvoZdQunIU/dA7A/mOFZqIaxm0y0AQhPlBjnDOOSDTTg6VPJ5Lo9m8Wc0CkEFQQwIIIBBB5g+IOKkzHQ6SFiY8rIF66RrhYRtGpkfSY36wDQEomMgiztVVgNsvmpyhLPmmKjaSNMu0bMPumilgimCse0UQsQBQa98d8t0ty/YWSQKzOEW1ddTk1QRwJF32sggcr5YjcN4tLLGXysgzAA3WYwIwGksNTLINC0Ae0hPO9uW03EdUGZgmgDyzNEsixFZ0hTYMxaPUQ2ks4BVeQA8cAx9GiMi3VJpXKu2ynUTHLI4Fgk+oxO4Pqk3ysB7U4qXJ5LKyOfkmZZDuGjikDKOQIML6lWr5ACid9+RHheczuRDBEjzUVllTUYmj2HZjDa1KnuS1Ao1zoAzdOXKx5dhzGdyYBoGtWYRDz8VZh78SuiMRTL9Wf4uSZR/NEzlR7lIws8e6RRZkZRGEmXTrY8xK0sbALHARIO3XVi30AknbcEA8mfo3mVkWV0ZWUzyUVII2IHMc9wfowBnGY8vA3J8YSSTqgrqxDsutSupUYKzLe9AsvMC9QIsG8ATxW/p/8A4JP46L6zixxiuPT/APwSfx0X1nAfNKHHeM1iOpxvqwEtb7sGeHZFyurTQvna8/Zzwvx4PcE4i0ThhzH3wDD3hrBGKg2zSJHFPC3cY3I37cWnuYfyTxCxdkMeYYmNm+MzMNLNtz5d+CuWkkmjmJjNFRIDGlKWisECthUbOxH4HtwEnBI2B9tXiogT5rfuPmRy+GI6TktZ+kY5y8/EePLHiQnv5fr8cQFMnnBFIbAKkbhuW9eGJHEM11rho9lXYXsdvecCcqmttzXjy/uxPddYHVruuxF2T51QoYDycmu1v54huT3Y7s5Gz2D4EY5TsoXY4DplJWuy1Vzv6thhlGZGYi6tSCVBJN7CxXfXf4WcKGQyzO4AF958K88EcnmOrkJ0iieZ8j9Xli5o+gvRDGRwnLBjZBn/ADmXGYlejJr4bAfEzd1f5xJ3d2MxlTTiPnsqsiFGGxr3EGwR4EHcYkY45zMrGjSNyUWf7vE4Kgx51upjkYWxMasPwmcI1ewk44cS4GGljzEZ0yxuX5tpfUgRgyg0WKCg9Er9GOWcyU4yTrFp+UhTIgPq9cG60KdxsWFXsO/G3DUzbmOSTMQ9UVDBYoWVmsWNTPI2kV3AXff3YCRkOLhnaKRGikVytPel6AIKP6rggg163OwCMD+nlnK9lJJE1r1qRBizRmwaC9pgCQSBzAPPkSvFuCw5lVEqm0YOjKSrI63TKw3BFnyNkEGzjhn1eFTKZ5XC/cnqFBvsi26saQCwJNiqvxBCvOI5CLMW2SjjlnGxKCIqoBoiYE7rSldNFwCdI2NSeicbZqIK0i5Ni8ihYoQA3VyNG2h5Roc61JIC6gTuBtbo+XzMkavFmkVmNnUgmjKsDshQxOeYp9X3PLfZX6G5Uy5Z8pNDFL1E0jay8qNrlkklDp2GMbL1lK6yFgb3BG4Sp+gGrf5S0jb0ZIogRd7B4VSRdzdhsQeKdGczDvDm3A0nTlwpneRhWweRg0Y5DVdLdkjBXM5jiWVjPWSQPGHJ67qpZnSMk0rxRlC4Xa5g1+Kc3HXolmS2YzGvMxZmQrEwaKMoscbLaotuwZGB1hgTZLbmhQQcrJmMhCZJuHrINFu+WlV2VUApHWcIxAG1qz6iGY0W3EdH8zwxIIosyZMjmLZm6zrsmzMXLntAqrr2uVkcthth0B+WSAlf2tE5IJsdbNG+xWiPm0YN6wIc0RstsXzvDopkMc0aSIatHVXU0bFhgQd98AH4Lk5w+o585mAqaUxw3qJFESRaRpAHLTe537sZwfoyIZ+v653ISVFDBBSyyI+7KNTkdWoBYk0PbiFxHgGXyGXzM2SiWCRlS9LMqnSwqxelBubIA2JwQ4FxeSTMTZaUJrhSF9cZOlhNroU1lSOr52dV3tywB4Yrj0/fwUfx0X1nFjjFcen3+Cj+Oi+s4D5pxsuMx6BgJ/DYonNSSaPA6bweyPBYbOvORAd34QrzIH04WIYiTtgiMm6gFlK33717/DFQcimkyU6NDKzIGUnSaDLdstWQbFjw3ONOJcfaRjHdrqNMaGoA7GioIsd2IWXZFanHWbcu1RvzFYmzJlvVbLiN/FXkI8vWkYfRio6Q8LjYWuoEDcaS3v7xWOee4Q8pGnsrXdy5c62xG1up0qSaHIhG+GparHNJSzU9AH1iEVb/ALIq/dgJGb4M+WRZFYOr7atNbi+zu1914kcCyyTMUYDXVhtTCj7BsfqxF6uIsNDHT95KrtZPf2XX6AMTwc3l9JjiiiBOzoqtft1Fq+GAnZjgWbc6UiGZA27ACn23yNcueIkfRZ3J1Q5iOhZUKj7ivutY8cTs1xpyNOdzE8xK7RI6RoNvuqA2ragL3OAc3F0JAWBFj+9Ek5vzsyHfzxR34dw2aSRoIfmUNCS3jZiPPS2o+wY7p0eVesBcOY99hy9u/ZOB7FB85BURB3S2Pf3Xqvzs9+Hzo7lzJl3ZlF6CTqqu/fSooe84YLD9EY/cnLe2bx/0mXxxmJXo0r9jYKJYXLuQAT8/J3DbGYw0Z8BukeZjjETTkCISgsSCRsjFboH7sA34gYM45ZlCVYDYlSAfMjADI+MJJPHDHTo8MkpkVr06WjVRX4QdiP5hwWRQAABQHIDuwH4Dm4NIiRRG60HTQVplUahdU9XzBODWAzGYzGYARw7KpFmJwi6Q4jkO5rUzSBqF9m9OogAAlieZY4XeFoycQkVSRoacyb7MsriRFra2t9j3BSPusGeMSiPO5Ntx1rTQE3Q3iMyg+O8RrvBY1zOBPEOCxy55w+oBpYHDIxUh0ysoBBG4oA4CdmeOzPJCuWjXSzSB+scA6o1YlKUNp9X1wSBfInCsnB5B14yJaQkXng8lLNMukmFCY7BrUrOpH752tTbq0y5JS7ZTKoYlI1TTx0GWzegNz6x7vVvpFnmRhiyuWSNFRFCqooAdwwAjozxuCZTCi9VLAEWXLkU0Nr2V22K0NitgiqwdwH47wBMwAwZopl9SaOg6n212l5Wp2NDEGDpBJBIIc+oSwNGZHZhkY/cmyTE97Uxo9x3rAMGayyyKUdVZTzVgCCPAg8xjlkOGxQgiKNIwTZCKFs+dDfElW254zXgNsVx6fP4KP46L6zix8Vx6fP4KP46H6zgPm4JjzRjrGd8HI+BtJHrjUsO+qvFQGiJ92GLhXGXXY2R32dW3kHBH1YBnLspogg+exx2ifzwDMsEEh1Dsk+AJF+wnY+YwOzWSs9kgnyJ+3EDVQvn78cxLW/fhUSzGVcdZdbd/6MMeXyMUsZUKpr7sMb9/jhRXNeIwa6PENIB21rdnUilQbszbclG/nVc9sUdcx0SfmkgNctQr4bm8GOD5DN9W8elOViQuqafHY0Tt7cTMl0hDuWAMd8lG9AAAbKD3Dn434404lwaHNtrGY0vRBRleRmre12G/4OKFGWRIZbOmd1Nk2Slg/F/jibmeMvm37ccaLWyxIqgVtf6+OOkOSy0bW5c6LpXHrEHlpHqjbvONs9x93XTSKvcirQX2Duv44gGZUKJQO47VeLCyXDnGTZgSBICAK3Ci97vCl0T4a0uYUiNmGoWbAA38Tthp6accKVl4xdWp35bb8saw1Y/oshKcLy6kkkdduST/AB8necZjPRY98Ly5oD992H4+TxxmObRsx4Rj3GYBczmXeLOwsjFIZhKJFBFNmCFaMkEGrRJASKs6RhivEbiOQSeNopV1I3MWRyIIIIIIIIBBG4IwMl6J5d9IkEkiryWSWVlHkV1U39a8BOl4zl1NNPEDYFa1uzyFXd+WJwOAXHiIFy5jAWszCgAA9WVurYVXg5PuwewAXpfBeVeRRbwFZ0rmWhOuhv8AdAFPY5B2xxPEI3bLzrWl4JJ78UWNK+ibBvN+o+19ltvHbCRNkXTIwnSUCcNzSEGuwZEhKA+Y0EfHAMfRLKsmWQyHVJJckh8Wk7X0ClA7goHdgzjSJaAHgAMb4DMcM3lElQxyKrowplYBgR4EHY474zACOEcJbLsyLKzZfSoSNyWMZBNgOTZStICnlR7jQHcGyjrLckc3W3LrlMlxuGe1ABbfs6dI0jSFI272jGunAeryxXfp5H7ln8fD9ZxYuK59PX8FH8fD9ZwHzv1feMNHQ3jpy7gP2ozepaBHIYV0bE7LgHFZWpxjo1lcyomgi7Nb6LBv33iteJcJMZOhiR4EUR5HDF0a6QT5drQ34ihy9+HWTKpn6KRosjDmbAY8/HGpUUyV8T+vwxyaxiyeNdGY4gRPlpUb7+Jtq9jMR8MKM3Ae9ZFo8tR0nEiufRzgPytmHWFNOm6jZyS2qh2fVFIbc9kbA88MOd6LGJs5HBLIGj60Kmkhni62dRHsTrZzlgbAAoDY6qVZPDEX1mWx3Ag/prHhWFhpYgEcjW3d4ewd3diRR7M8K+SB2LLMyarUo6AANApOpXBJ/bCGqqtW9iiBbN6zyUb8gDX+9vghlui8ZAPyqEeShy3wAwzcJ6AmTkszjxpUX4sSa9mLNQtxTic6H2lJAV1UUxJr52vMjt1e5LXzBPK8A0OseYDGQi+qQMz2RYDVsu29XfLxw+8I6GDLW00qxKRWmPts3kWZSeXhWJ0GdysNDLxHYEahZeiS1Asa5nx7ziwoc6fsflmtakCmv3sBAfIcyfefPFT8UzrSuXZibOHjpes0q6mKlKJUgmiB339h3xXOZJBw0x9HeiFv3Jy3tm/OZcZjT0O/wRlvbP8AnUuMxiNHW8ZioOlXpUzmWzeaghyaSR5YrqkOvsqwWi1bLu1YDxenPMnY5WEf1nwF74zFJH00Zn7nLQn+s+OQ9Nua/wBFh/tPgLulhVq1KDRDCwDRHIi+RGOmKWg9MeaY18li+L4Jx+kzNEX1GXHgNT38BiwWtjVkB574rOL0h5piay6HzAkr68ToemWcIs5ZQPY3/NhNSn/HuK9fpzmB/Ex7d/ar68RJ/SLmV/iIvi+HjpVm4zFTt6UpwL6mEe0vtjofSdPt8zFXjbfpwmlWpjMVJL6VphfzMPstv045v6XJh/Ew/F/04RVv4rn09H9yz+Ph+s4AN6Y5vuYISf5zcvjg7N0/kPB5uJGGMvHKqCM2VIMiLZ777ZxB86rIPEfEYnZOQXQYX5EYt3LekXiskQnThMTRlSymzbqvMopOpxt3A486L+lmTMmTXlsumjTW7b6tXj7BiorCXMC6JCnw5e/E7hfGjEwqQD3/AN4xdOS6cI/rLAvt5fG8ED0iJ9SOFx4r2v8AhJxeor7hXpGdBR0OPDUftwwwdM8lOPnoo78xq+oYO/4xt/JRf2T+nHaPjzE11Uft0n9OL04CrxPhgP73AD+EFX6xjunSLJL6iwf1Sv2DBE9IW/kovgcdDxqT+Tgv34vfiA+a6c5eMWAv9UH9FYXs/wCkUvsiUP5/2YcB0il/kYvpxvL0kK84ovgcOrxWE/H5ZQx1UPaKODGSfKEsOs7DaRqs6gNJsns7GzVeQ28Wx+mii+zDXmCL9mNT01UCysCj8I1eJ04UeLyZZUCKwptV25A2U6S3Zu2NAnuBPuVs4eHKuYIkQv1DqmomxIShXQNFE+v2ybAVfvt7CzXpRRbqFHI7lH2k4kcP6dyzoGjy0AJaqYk0PE0LxOqK+hvfg+Wrxn/OpcZhi6PZl5IyZBGCHIHV3VUD3nnZOPMRVO8XeNc50haWPrEEcBKWwDHXHpBKkMF1VdEGrwj9IsjEcnls7FGITK8sTxqXKB4j6ya2ZgCrDYsdwcMPS3pHJk+LcTCRQyrOUjkWVSwKhEJGzDndfVvgBP8AKM8ECxJHBAgRI49QjQElie0zMzsxssSScQAMuCxoC8M/DOjrVrkYBdt75fRghlshl8qutyNVbAg2fdha4vx9pGOk0vKhtt7MaZM7cQysQKnVI1cxy+zHOHpPKh0xEafAgE8sJS5jxxIy7WcKG2Xjk0gOpifC9vHw541izLH1iT9P23gAJDW1j446wTn9T+tYtIZYs/W428xzx1TpQ4IF6l32ZQRywCTiFLQ3vuvHCTOg8wB41hSGuHP5eQbgxsefepN77WSBjlnOBowsMB5qT+ownTycqP2Y2XiTpurkV4E4UEc5wRxZTtDAXMBlJDc7wdynSBmYB638NjvjvxvhokXrEHd9n93PAKbTfRix4Hvonmj/AKwv5eHFWSmtrxaHDP8AJLM/0lfziHGFwM/Y1p5srxKPMpFlYocsJJAyiSD5PCiOojPaZiytpoEHV4YSOBy0W/q/bjgkC8yT+vuwydEejjTPSkhe9jv7AKHPFxdTeExySGo9/bt9eLB4L0cCr1s4A5bkn27AVfxwQgy0WQiGsqW5hCdva2Ezj/TGSVtiPCwNh+jG2DlmOI5Rdh1hr7rbn7P+2I8PSBFsaFPmdX1XhAj42U3DEsQQdtqPOhWPctxEHexti1T7m+kbNQDaR5KBWNT0hSu3pO25Ikv/AHawl5zilBSPiAOY+nELMcULczv5nEqLEg45k2I1RsD4jWPoLYmycUUD5mQhfB1vFRHOkHnRxMynELKix53f92FWLLPEIpQRPHQ5B1rmfEXX0Xhf4z0LYgywMrJyu9x7scc3wuRUR+uV2atCLZKg723cOQ8cdOG8WmyzanAUeI7Q38hghH4pl5EtWGw51if0R4iUfQz6UI5GyLvyxYnGYIM7D1iipNPkFO1nYAV78VLPEI5WU9x5+GJvFx9Gej1lMEpS9JmNX+Lj8cZgN6EcxryMv4OYdf8A0oj/AO7GYzrSl/Sif3Yzm/8AGD3fNpievGVy+XRAQRWwWqs9/jjj6RhXGM45OyyL8erSsJfEM4ZHLMb+jDNiJHFOKtK1n4YhRPRxwY4kZWE3zGIqwsseFtloEmWNH0ku8ZcOCkEOzbdovIsgq6FkiibEnMQ8K0OYyF7DhKMunrNINBjvIdQFByezIx22pA+T+O3swy9GM3GgaCcXl5a1iyNLKbR7AYqVN7hSaY7HkSJPH3yZjK5RQrCZAKeRy0fUai3zl1842kha9Qbc8BITWxGCXEIRFvGpADsh1EWki80O1WAeYJVtyDzCwoELvZIAJ5nl8cXBM4fLHqBkWl35nTvW24wOzEqncCt8FM+koXQFtWF9ne68KHPC+0DWLtR+ED9uKj3Xvjxlvc46LEAPDxNY5MF8/wBfbiDikxU863w4dHs/qVkYg9mxy5+zCSx3xLyE+hh+nnhiteLR07XufHFj8MH/AISzP9JX84hwjcZTbXtvv7sPXDP8ksz/AElfziHDTFaZKHUwUC7IGLUyvEI+HQKAgMpG17UT3+OK76PIOtBNdnffyxpxnihklZr8h7MXNgK8T43JKSXY/G8CDnT3YHyTE9+O2SQsaUbnEIOZPMZfShlEzdrtINIGm+5tV3XdQ9uGfhfGcgpGuENTiykRUMtqdhzBAsGit+B54VsrktJ+dBA7q5H3/ZgjBFAPuL8zYP0tixDHk+O5RoxHLFbtGgI0BgGEsbvVUVvS2k2a7Psx1yHEMgkel4WtkXrDpBsaNxWwU2WNjftDfYUCzHEEVNMSaQwpjS7+W4v4Yn8AVswD16ho4gacsFKkkkBfv1uzoJrc0Vu8Brn+I8PEASOO5CpBagDrEbUa6wso1hd6A3Pswo8ObXKq3zYd19+523wc6QwSyohgXr4VJC9VGey3MiQAFlbf7rY92IfCcroUoVcHcyMAKH4B3277PPAFsvnOoeUJD1+xFlmRU/Cu7J8r92Bj9IomNPAQe8iR/t+rArjPFS9KAAsfqrVgV377k+ZwX4PxA5oiHMqsgINORpKV4aO79OAIcI4k8LgMzdWTsb2o8rPd7sdOlHB1lIkhK3Vnz25+JONOiU6JK0E9Mqa9NjmQNjXcLF74nQcWMxZQwTSSC3eF5bbeHs9uNB39AakZHMA7H5W/5vBjME/RI8By+YOXDiP5U1FyNTH5PBZNbDwoeGMxzaUf6VZiOK51Qecg/JJhHbDp6Vkvi+c2v5xfyaYUdK4CPghw7N9Wb0gjbmLr3Y5RQpfaO2D/AAnKZPcPOaYbWh577Gr8sBzOXaQa00Ed4SwR/VP2Y1mYjsqDdciK+vEcxFWPVs2x2q/iCMM5kmCh5JswshXZtGn3GhvjTKBlc25QyIqsUVFnU3pkh7EUTsA1sVakJBFHqSO0XbEfPKjdtHFHmhO8ZobN4rZOk77VdGwJnCmjDdaWkJBOvsoQwOzA+TKSD7cEOKcMytK8fWaX7SuQTsdyu5olD2T37b88AH4dxYpG0Taq7nTmPf4eWNkaNhqUtKw++NUfYe7G3yfLjYO5BPPTWC2T4eoRuqsrXrEKPcRZrALWZLm7Gkb8rxEKnn5Ys9c3k5XJlijLanbtKBYaQhb07NpjYk3zZV5nkHzOayopfk6y6WNgQwrrBkDDlvHpUFOyDru2rfAV+UJPLGpBBFDFgZTimUEMkb5VHkIOiRoYVptIAOhewosE6ab2nEpuI5CtfyOMkvJaiOEdnUpQ2BsAtil5kNfO8RSFmHPVgH6eeLF4V/knmf6Sv5xDhV6Y8QimMfUQiFVStKqFXVZJKqGbSCSTVnn78NfDP8k8z/Sl/OIcQxWyZnQpo+tt3csDzZvEiVbxpE9HkCMFc68cT+GzoD2oY5CdqkLge20dSD9HliE2551g1k+DxHLvKcwokU9mOvWFeP3JxUF8rHNoCtBpU7rpIbUPbZLe+8c8xDJuAlKOdjSfi1X7sBRxOeKlSeQLsdOo6Qf5p7J+GGnh3FWkQrNmTECPV6pKb+yoIPmfDFQNgkYVagAePd+nHWTNTD1XrwoAezYjBuHhuTJU/L2TbciAsN/YTWNpMhkUPYzLkV++BTfvTcj6MBGyXHyqokxkUJ6piVEazzDEAagfPHbiQhzMaiB44QnZELaEDX3qdyG3Aptj4oBRHZrKwWameTbvQj68TMrHpUfJzIaHaLiMHfnp2tfjgF7iHBXRmBTSRvRFd1g+YIogjmCD34n9FYHL9lKC+vJ3KK5XyB378EvlVjRMDIgBBtjqS+9G+5PlRU945UMyckah1bV1ek7KQCTtvbbD6MByid1mlnijJjViCxa1Nk1ZJHwAOJHRdlaVxLsCGIFmrv6cTOE8PIIjdCpIto0Oo7+qHJ1AGqJHddGjiTxjLnLoksaMEa16ylonvAGmzy5+WLmexa3olFZWcAk/tludD+Jh5DuH9+MxE9CM+vJTN/rT/kYcZjGtKe9JA/dnOfjF/JphS4jlirH6MOHpKIPF82K361dx+LTEDiOVYxKSAa2B7/fipSpDCSdueCOSyDkmlJrmBz93jiJp0ttgrFnSQAx29m+BU3Ju/qLqWueoU304Ntm5FhpZCa5qzXfmO8YGZTPJXMqR3m2+vesFsrlomFarJ5EUb8u6sVAZdTkalAvuoC/fW+OudmNRpZCqT2TyBJGqhyF0PbWCM+SKrpUnvNf3tjWCJUoOSANxYvfyOKIGU4eXUuxKRi965+/DBwjJpocq5CjnqXSWYg0F335WfK/fMeCUxAhkSPvJAO3MmqJv3YWM5xaTrNJb5sDTGpAGlbPOubG9z7BsFUAG/iMWSiA1RozC2PVtezOdCmmbUQhtiCO1GLrVuCyWdyhcSSoLG2kK2nZ5DdhmJ7DRrWk7oScQhTAG9vKj9BxEzOXQ3pJ+NfViAbmpiXaj2SxrYrte21n6SfacdxIVWq388bwRAsBW/wCvfjvnI2qhzP1YQA8ySTRxZvAIdfRbML/rN7eU0J+zFd53I6Rvz8LxZPAJCnRjMECz8or3GaIfbiaqpc0lGvDEcLifLHqb347fIaF2D8R9YrAqDDl9rb6MSIFIVtz1YotsLr343klK8h8cTuG8SYMAJHjB9bQzUR5i6PwwE/hjhh2MtFVbNJFrYnx3G2JcmfC7TIr2NgqKCD8D9GNlkieQKkkjKeRbn8LoYJNwJ12dbU8wDv8AA19eNZiAKzqTSrpH4IA+JG/xxq7gbkbHwO5wak4SQpoEgczVV7Tvfuxvw/SjJqPaBrT5e2jhCoWR4YZVM0rmOIGgdIYsfAAsLwReWGJfmVJPe0i0fYF7vdghxrMzLpKyrEh5Eet7uyTheh4q7uyyysxsi2oWPMqLwEDPZpjZa9+W1X8PtxtwV+rXrXAIZtKR8yzAAlytdqNaI5ka6B78MM/RyJouvdiSpBIW91v1UBAtiOVir3Jq8AoYipWeUmLYKix6hsNqW72vUd7slibJJwBHohwNps0RIXNsxOskDck9rxw0+k9uqy8ca1S7Uo/B8fsx76P4tU+ptTMTZLGzVfrtgf6WXLPua7TDfwr6MX0ho/wfD+58/wDS3/N4MZj3/B+FZCcf62/5vBjMc21U+ks1xfOE/wAqv5JMEOBKJo9Fi++/7zgd6Th+62c/Gj8kmBXB860bWpIxcTW/H+ASxMSUNeIG2BykjvxbnB+KQ5pernUWRs2w3H145dIehGXVNaod7OuMkj3ju92NRFe8PySSLqkzBj8OySL8yDtjWThsqdoWV+/Ug3/ZweXhAvTUZX4N9WIWYjnyrfNOyqfuSu302MBFy2YmWmGtdJvvrb3YLZfPGUUz1Zs2f1v2Y5Nx6cx7sp9qJX1YEyZlidWlaPcF2+jAO/D8nGyfOMG5gX3D3/pwA43wlF7KMCBvdj6sQcrxGhRJHljXN5zXzu/Pl9GAiSKicns+yv8Avibl0VhRYj28q+zEbLZIsdhff3/owWy/DWJ2H0YgJ5LJIq14gWdhQ9mNMzEGvSNh8MdIYBGDqR2PjuNsQOKcUpdKJXt9mNIEZyO33rburYe/FkZaMf4uTgDbrk2H42HFVNKxazizOGSn/Fqck/5wv5aHGGlZZuIA8qxvllNePxxzzU5PfeNcpmyrX9fI4IjZ1gTsBtjlG1ncDFm8H4Nk+ILSrHHMPFq1fCsDOIdCEhcq7mLfmRrQjx1WCMWBdyEeolesUbbatVfZWJJzOaiI1dYPYW0/owTi4IiE9XLHKaOw1b/2cRuHRZsGQqWQKBsYXcFmNAaArWNjZAJG22H4OScckN22/mD9J2wYyub61RqC6u+iN/d4e/B2Dg80iTLJJCWGynqUWicwsXaYBe5tVkeFbG8Lc3R8xyiEzx6iiOCqswqSZYV3HZFuw5E+q3gLUHoeFQOpLzC627N+6754XPkaCYFW6xlJIU0PV3tidq2sk1QB3xLm4U8PVdY4Aljkcm3Ojqo+sYEabHZqtr35eMubodmO2Y5oxYo7dpk1mNqsalIIIIW7BAJAbFoj5jNvIxSBx2NXaW+2b9Y6e6tlvkPMnAuPgmbdy7xzSGt2J2oeLE0BhgynRSdFj05jR1qq1BXU6DpFsDRUjULG1b746z8HkR3hZ3cqaPaZlO17WfPwxAS6MZoQrS6dYG9Dy++XY+7Ch0tz8jOwJ3s936nDiMqIUAtUY93M+02cI/SaNQ5tmZr3JFD3Y0i0v8H4/tCf+lv+bwYzHvoB/wDIZj+lv+bwYzHNtU3pPP7r5z8YPySYBQjlg16URfF85+NH5NMBMs5HgfbiporlGax3V51h24F0hniFaiUrccxXvwi5SSyBWDWRzTJQrny3/Ri4h9hmyU3akipvFB9hxxzHAdXqprX6fpxp0dzMbDtJZ35f9sTZcyEb5tjfdd7Y2hMzfB0jchg6g/ckHl5GqxD/AMXY3PYnrwDBr3/q1iyUz0prUdQ8DuPpxIzEcdDVHE3tjH2YkFXp0Rbl16V4U1/8OCvDPR1LJXaDLfca+sYdkmVPV0D+bGBiDxHiLEdqR9I8/sGEHOLojBCtTMBXcpsmvHGoz2XitYx/WI392F7O5xWHY1tvvZr68DJUZjYQewkEYAxxLjCMT34UOJ53Uxrlg7+wzstsQo8AASffeI+b4RGoG7MfvRQF4mqXYTvvv7cWLI//AIYzBAA/bEfL8fBhMlgINaVXyFH6cP0PDZZejmYhiXU5nQhbUXUsLHckDkD34zqqbMmPVk8cHf8AErP/AOjH/aQ/9THh6FcQ/wBGP+0h/wCpgIXDs40bhkNHFsdG+l8c8fVZ1NfIA6Qe744rVehnEL/8sf8AaQ/9TBrhXAs/GCDlm/2sQ+p8XNSHfPdCMlN24WCk93a+o41g6JTKChiV1qrXsk+R3FjETg+V4gpACkDwd0YD3A3hsR88g7QTfvDE/bjXEI2e6LvGTeXzFWaKtYAJs7att99sBc10bJYlZnS/5RZL536wBvffni24Zs5Wql27rG/047pxWejqhN/zk+q8OCp8j0I10PlYNXQCSmgeYHY2wy8P9HTRkO0mwINubur+5I35nmO84bP2QzR/itPgNa/HniBmoMw+51b9wcAYTByzcWTQ6jcsgrdtVAiqoLQFECvYMBszxkgnq1VCa3Crf0k1iRnOFT1tGf7SfacAxwLNXfVGv56f82AG8TllYka2rvHKz47YXeIwge39e888OuZ6OZrZhFufwk2/3sD870UzTD9538mj/wCbED36Bj+0Z9q/bT/kIMZid6G+GS5fJzJMmhjmWYC1ax1MIvskjmp+GPMYbf/Z)


1.2 Historical Background
Ultrasound technology has evolved from large machines to portable devices suitable for use in clinics, emergency rooms, and rural settings. POCUS represents a shift toward democratizing imaging access, especially in areas with limited radiological infrastructure.
1.3 Basic Physics of Ultrasound
1.3.1 Sound Waves
-
Ultrasound uses high-frequency sound waves (>20 kHz) to create images.
-
In medical imaging, frequencies typically range from 2–15 MHz.
1.3.2 Interaction with Matter
-
Reflection: Sound waves bounce off tissues with differing acoustic impedance.
-
Refraction: Bending of sound waves at tissue interfaces.
-
Absorption: Conversion of sound energy to heat.
-
Scattering: Redirection of sound waves in various directions.


Beam Shape and Focusing:
-
Narrower beams increase resolution
-
Beam width and depth impact image clarity

1.7 Image Quality Optimization
Factors affecting image quality:
-
Proper probe selection
-
Adequate gel application
-
Correct angle of insonation
-
Adjustment of gain, depth, and focus
-
Minimizing patient motion
1.8 Machine Care and Safety
-
Clean transducers with approved disinfectants
-
Avoid excessive gel near ports
-
Regular maintenance and calibration
-
Electrical safety precautions in wet areas
1.10 Ultrasound Artifacts

1.11 Clinical Integration of POCUS
Applications:
-
Obstetrics (e.g., fetal biometry)
-
Pelvic scans (e.g., uterus, adnexa)
-
Abdominal scans (e.g., liver, kidney, spleen)
-
FAST/E-FAST for trauma
-
Vascular access guidance
-
Monitoring chronic diseases
Gynecology/Pelvic Ultrasound
Contraindications
- Pelvic pain
- Dysmenorrhea/Amenorrhea
- Menorrhagia/Metrorrhagia
- Prepubertal/postmenopausal bleeding
- Signs/symptoms of pelvic infection
- Localization of intrauterine contraceptive device
- Screening for malignancy
Contraindications
The following contraindications apply only to transvaginal ultrasound.
- Pediatric age
- Premature rupture of membranes
- Bleeding associated with known placenta previa
Transabdominal Pelvic Ultrasound Protocol
Transabdominal Pelvic Ultrasound can detect most larger abnormalities such as large fibroids, ovarian cysts, neoplasms, etc. However, its views may be limited by abdominal structures such as bowel gas.
In general for POCUS exams, it is usually good to start with the transabdominal ultrasound and then use the transvaginal approach if needed.
Patient Preparation
- Supine
- Full bladder (if possible)
Ultrasound Machine Preparation
- Transducer: Curvilinear Ultrasound Probe (Ideal Choice) or Phased Array Probe.
- Preset: Pelvic or Abdomen
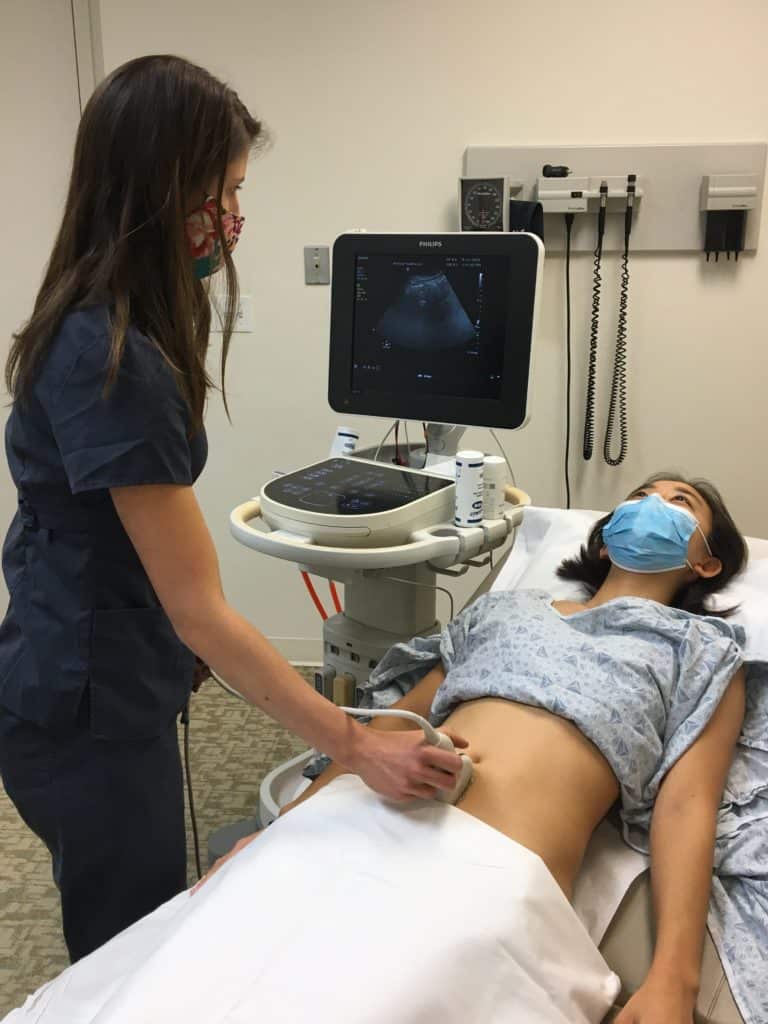
- Machine Placement: Position the ultrasound machine on the right side of the patient with the screen facing you. With this configuration you can face both the patient and the ultrasound screen, scanning with your right hand and manipulating buttons on the machine with the left hand.
Identify the following structures:
- Bladder (use as acoustic window)
- Uterine fundus
- Uterine body
- Endometrial Stripe
- Cervix
- Vagina
- Posterior Cul-de-Sac (Pouch of Douglas)
- Rectum
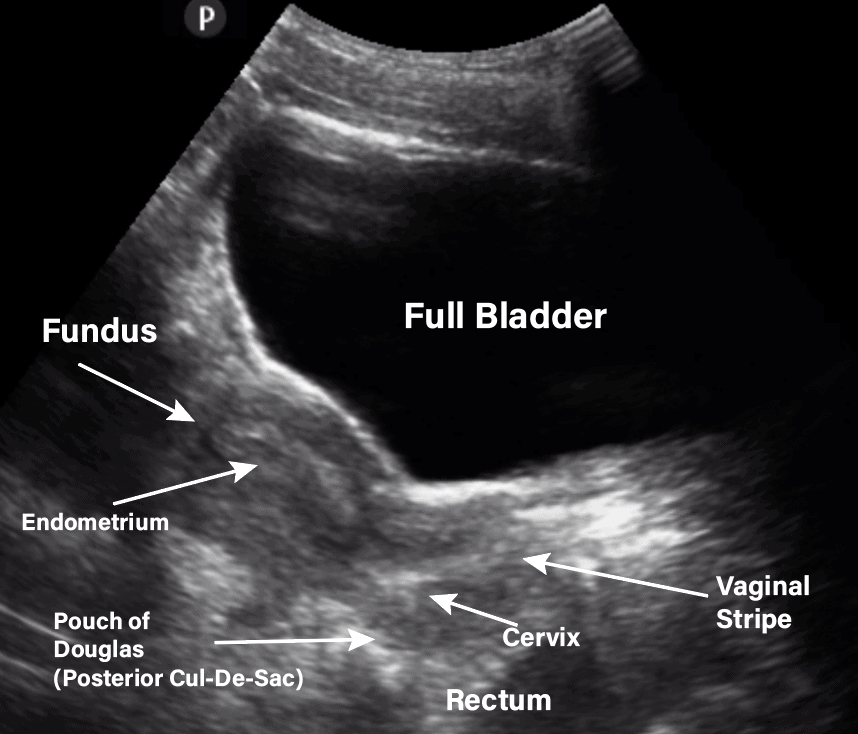
Transabdominal Pelvic Ultrasound Longitudinal View
- You may see Nabothian cysts (small, anechoic/hypoechoic circular structures on the cervix) on ultrasound. Nabothian cysts are usually considered benign findings and can occur in about 12% of the population (Fogel 1982).
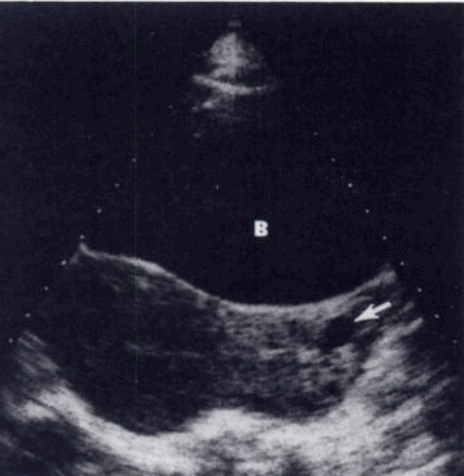
Nabothian cyst near external os of cervix
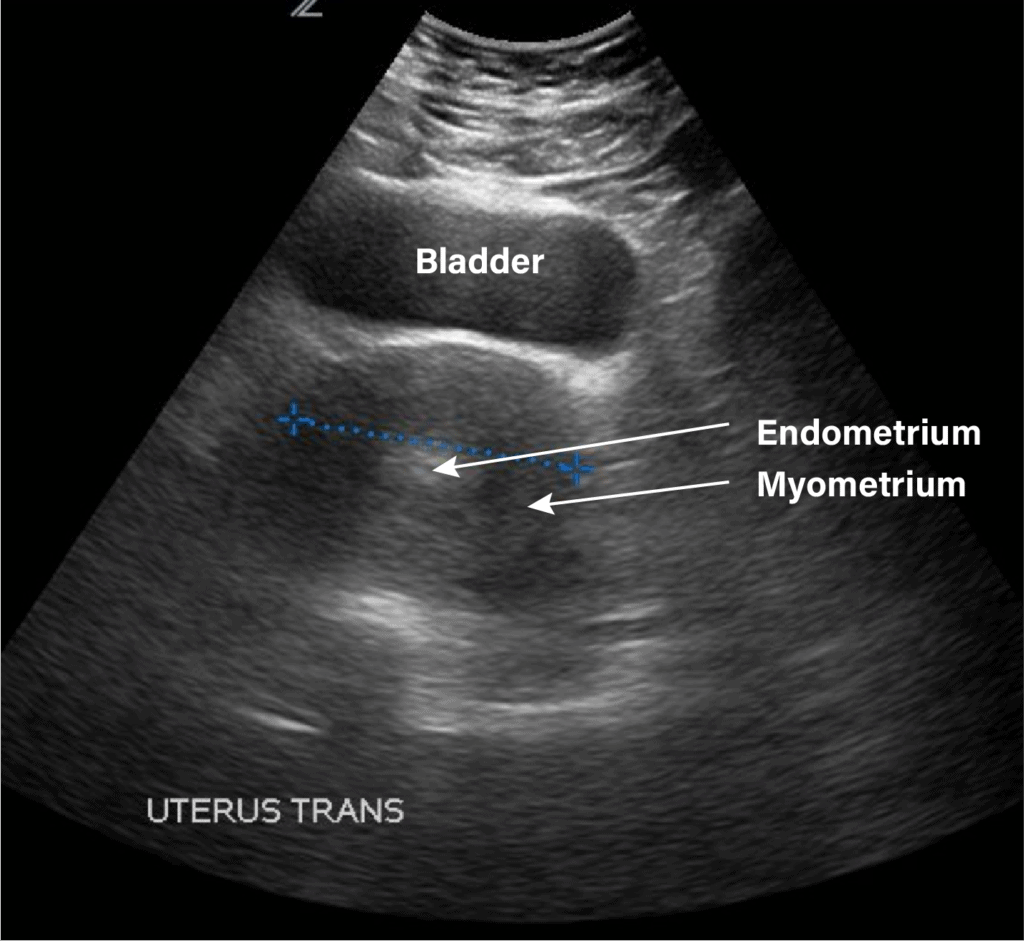
Step 2: Obtain Transverse View of Uterus
- Rotate the probe 90 degrees counterclockwise with the indicator towards the patient’s right.
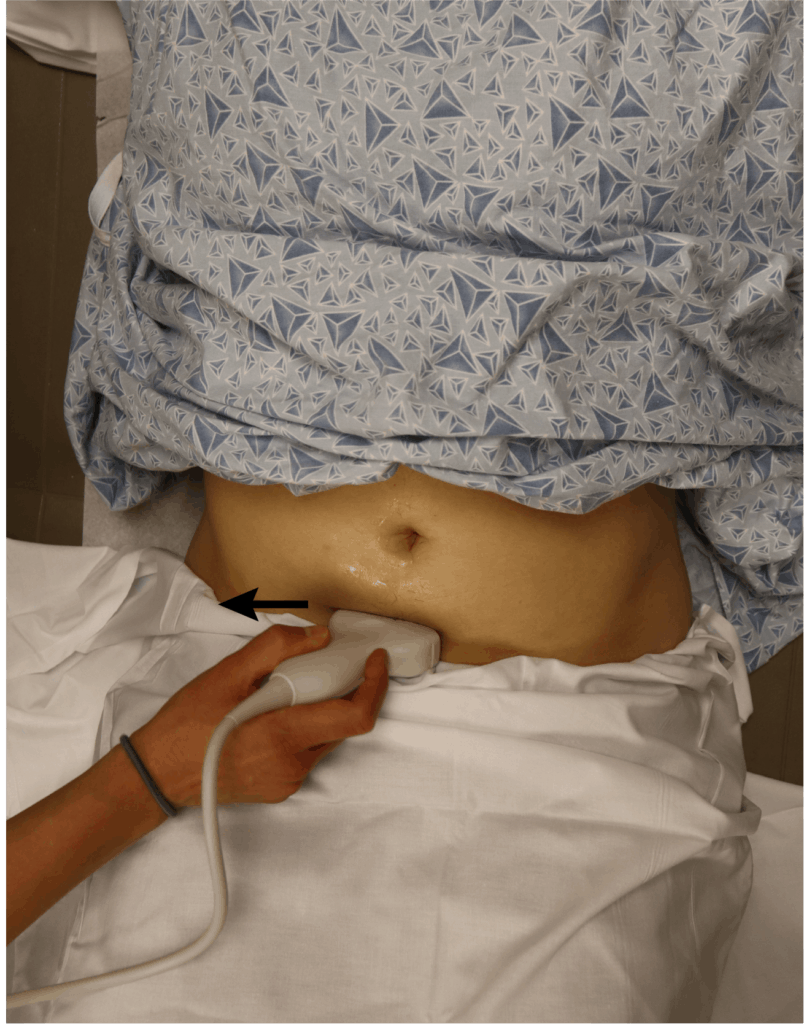
- Obtain a good view of the fundus of the uterus as well as the endometrium and myometrium.
- Tilt/fan your probe through the entire uterus in the transverse view.
Step 3: Obtain View of Ovaries
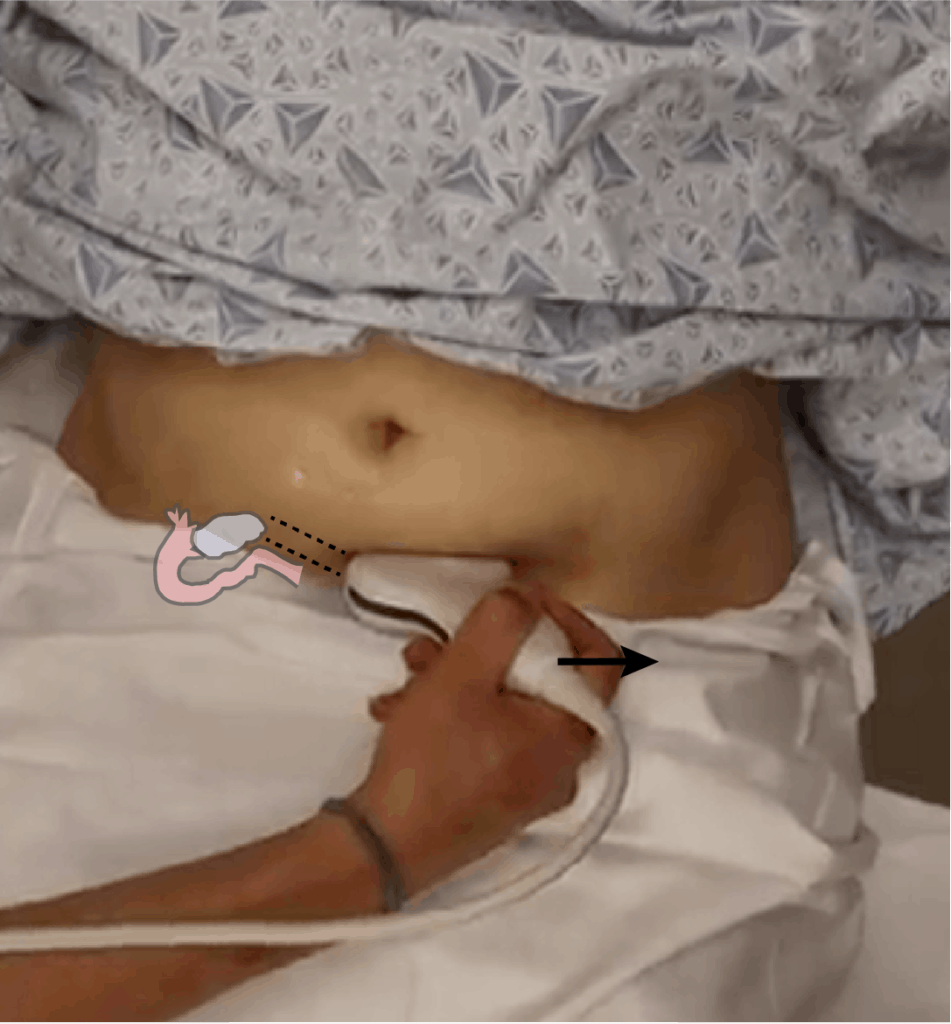
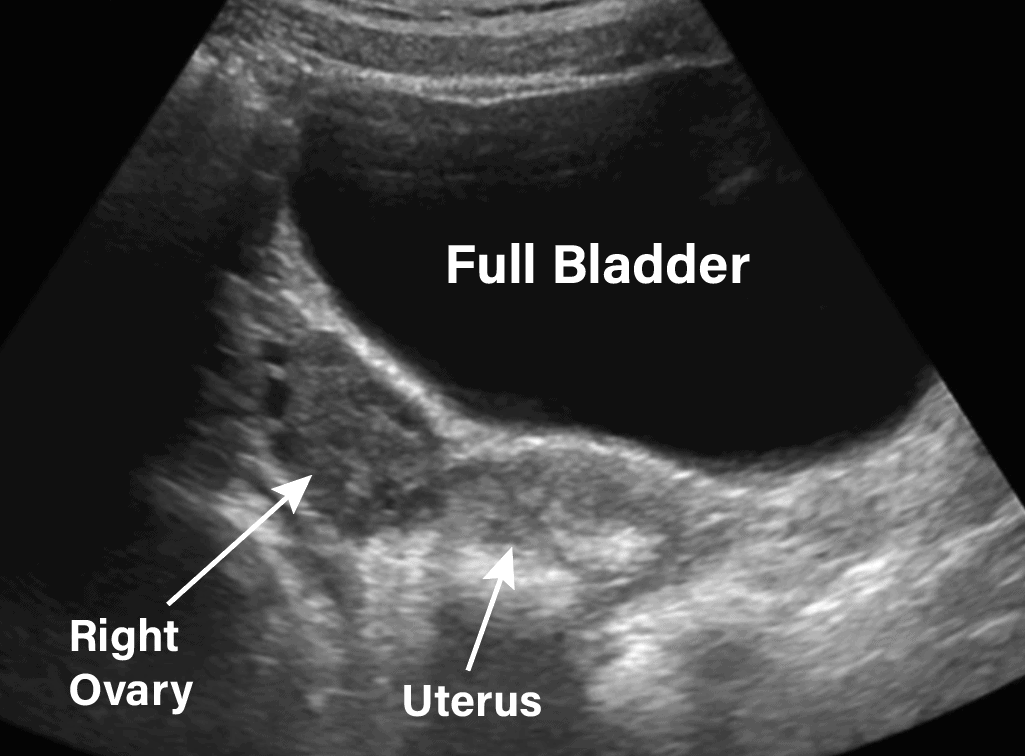
The ovaries can be difficult to find because of the overlying bowel gas. Having a full bladder can help visualize the ovaries in a transabdominal view since the bladder can be used as an acoustic window. For the most part, transvaginal ultrasound should be used to evaluate the ovaries.
- With the probe still in the transverse position, rock the tail of the probe to the patient’s left to visualize the right ovary.
- You can visualize the left ovary using a similar technique (rock the tail of the probe to the patient’s right).
1.12 An ovary can be identified on ultrasound by the following characteristics:
- Lateral and/or posterior to the uterus
- Typically measures 2-3 cm in diameter
- Less echogenic than surrounding tissue
- Static (compared to surrounding bowel)
- Anechoic follicular structures
-
Transvaginal Pelvic Ultrasound Protocol
Transvaginal ultrasound gives the best resolution and visualization of the female pelvic structures. However, it is considered more invasive than the transabdominal approach.
Patient Preparation
- Dorsal Lithotomy position. Make sure to have a drape/sheet and cover the patient properly. Position them similarly to how you would perform a normal pelvic exam.
- Empty bladder (if possible)
- Have a chaperone present in the room with you.
Ultrasound Machine Preparation
- Transducer: Transvaginal/Endocavitary probe.
- Preset: Gyn/Pelvic
- Will also need a sterile condom (or sterile glove) and sterile gel.
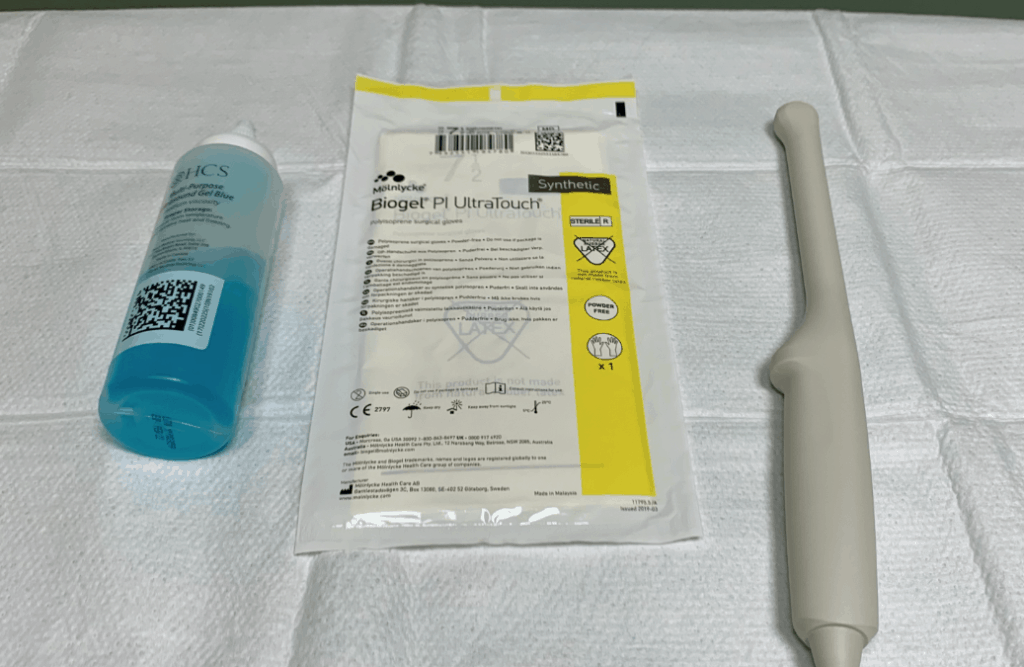
- The indicator is located at the 12 o’clock position of the probe.
- Place gel at the tip of the endocavitary probe.
- Apply sterile glove or sterile condom over the endocavitary probe
- Apply sterile gel to the tip of the covered endocavitary probe.
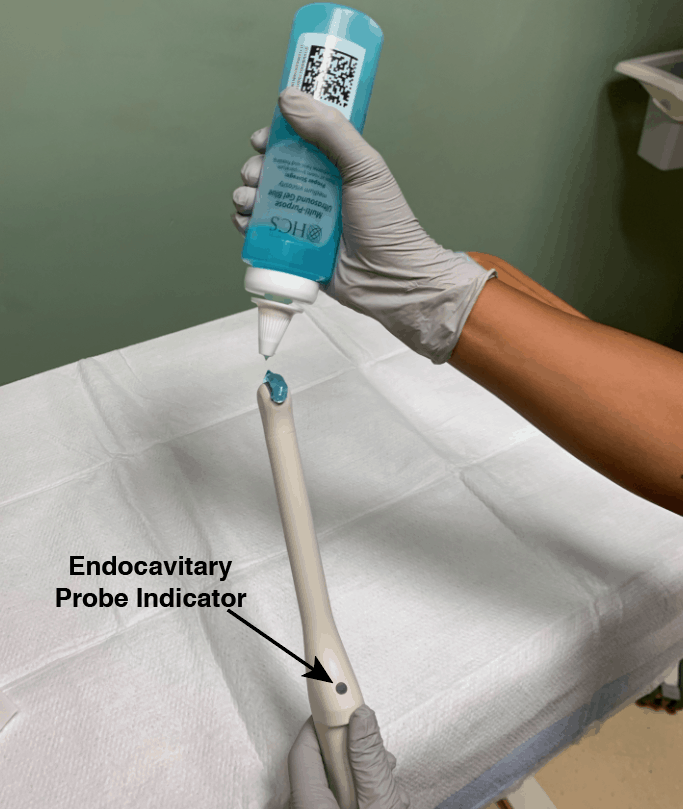
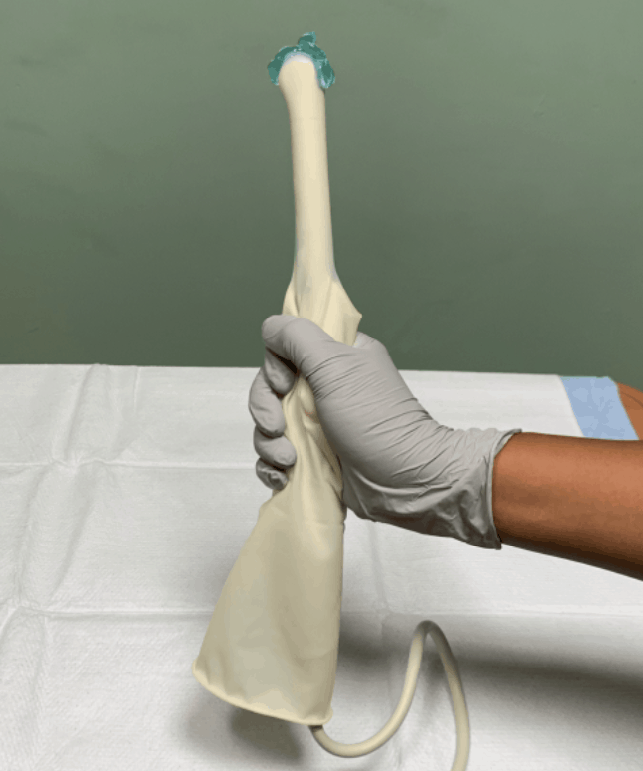
- Machine Positioning: Position the ultrasound machine on the right side of the patient with the screen facing you. With this configuration you can face both the patient and the ultrasound screen, scanning with your right hand and manipulating buttons on the machine with the other hand. Also position a chair at the foot of the bed to sit in while performing the scan.
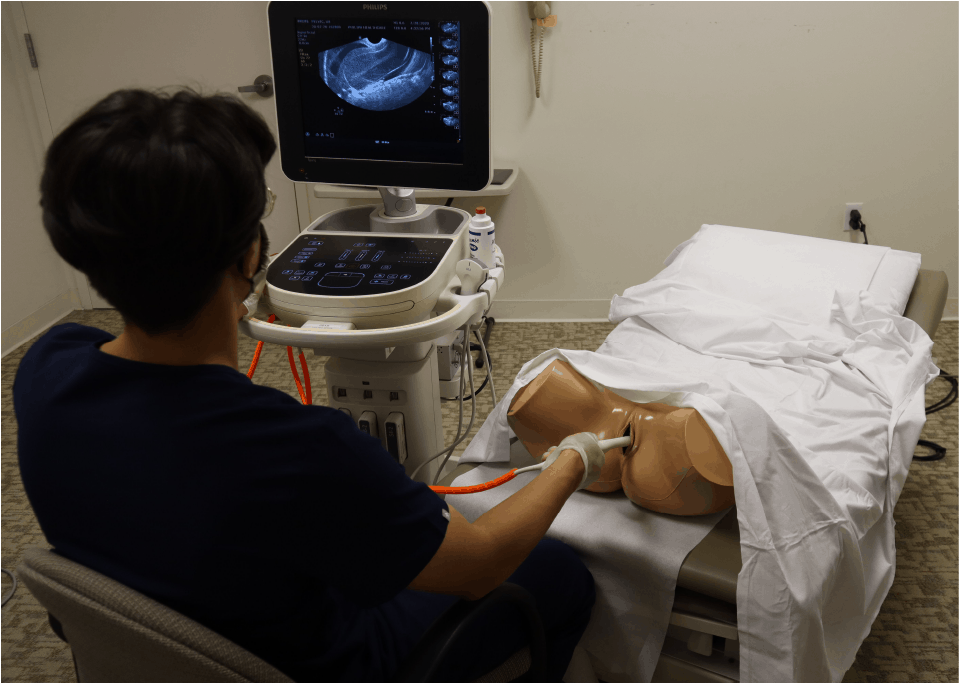
Complete Transvaginal Exam Setup using Blue Phantom Model
Liver Ultrasound Probe Positioning
1. Patient Preparation
-
Patient should fast for 6–8 hours to reduce bowel gas and distend the gallbladder.
-
Position: supine (lying on back) is standard, with possible variations (left lateral decubitus, sitting upright) to improve visualization.
-
Apply adequate ultrasound gel over the right upper quadrant and epigastric region.
2. Probe Selection
-
Curvilinear transducer (3–5 MHz) is standard for abdominal imaging.
-
Orientation marker should always be consistent:
-
Sagittal/longitudinal view → marker toward patient’s head.
-
Transverse view → marker toward patient’s right side.
-
3. Probe Positions & Angles
A. Left Lobe of Liver
-
Place probe in the epigastric region, just below the xiphoid process.
-
Orientation: sagittal plane, marker pointing cranially.
-
Angle slightly left to catch the left portal vein and left hepatic vein.
-
Adjust depth to visualize liver parenchyma anterior to the stomach.
B. Right Lobe of Liver
-
Probe placed in the right mid-clavicular line, just below costal margin.
-
Orientation: sagittal plane, with cephalad angulation under the ribs.
-
Look for:
-
Liver-kidney interface (Morison’s pouch) — used as a landmark.
-
Diaphragm as a bright echogenic line.
-
C. Caudate Lobe & Porta Hepatis
-
Position probe just below sternum (subxiphoid), angled steeply toward the patient’s back.
-
Sweep slightly to the right side.
-
Identify:
-
Portal vein entering the liver.
-
Hepatic artery and common bile duct (CBD) (forms the “portal triad”).
-
Caudate lobe posterior to the portal vein.
-
D. Common Bile Duct (CBD)
-
Visualized at porta hepatis, anterior to portal vein, with hepatic artery.
-
Appears as a tubular, anechoic structure.
-
Normal diameter ≤ 6 mm (may be up to 10 mm post-cholecystectomy).
4. Scanning Tips
-
Use deep inspiration — pushes liver down for better subcostal window.
-
Move probe intercostally if ribs obstruct the view.
-
If bowel gas interferes → patient can be rolled into left lateral decubitus.
-
Adjust gain and depth for optimal contrast between liver parenchyma and vessels.
5. Clinical Relevance
-
Assess liver texture (fatty liver, cirrhosis, lesions).
-
Check vascularity (portal hypertension, thrombosis).
-
Visualize bile ducts (stones, obstruction).
-
Confirm anatomical landmarks for guided interventions (biopsy, drainage).
Pancreas Ultrasound – Probe Positioning & Notes
1. Patient Preparation
-
Fasting 6–8 hours (reduces bowel gas, distends stomach/duodenum for better window).
-
Best to scan in supine or slight left lateral decubitus.
2. Probe Selection
-
Curvilinear transducer (3–5 MHz) → for adults.
-
Higher frequency (7–10 MHz) → thin patients/children for higher resolution.
3. General Probe Placement
-
Start in epigastrium (just below xiphoid).
-
Orientation marker toward patient’s right for transverse views.
-
Use stomach as an acoustic window (sometimes water ingestion helps).
4. Step-by-Step Views
A. Head of Pancreas
-
Probe placed slightly right of midline, transverse orientation.
-
Identify landmarks:
-
C-loop of duodenum (surrounds head).
-
IVC posteriorly, CBD passes posterior to head.
-
-
Head is anterior to portal confluence.
B. Neck of Pancreas
-
Probe in midline epigastrium.
-
Neck lies anterior to SMV (superior mesenteric vein) and portal vein confluence.
-
Important landmark for vascular relationships.
C. Body of Pancreas
-
Probe moved slightly left of midline.
-
Body lies anterior to the aorta and SMA (superior mesenteric artery).
-
Splenic vein runs along posterior aspect → key landmark.
D. Tail of Pancreas
-
Probe angled further left, toward spleen.
-
Tail lies close to splenic hilum and left kidney upper pole.
-
Sometimes difficult to see due to bowel gas.
5. Scanning Tips
-
Ask patient to take deep inspiration → pancreas moves down.
-
Lean patient slightly left → spleen helps as an acoustic window for the tail.
-
If obscured → ingest water (stomach filled → better acoustic window).
-
Optimize gain & depth to differentiate parenchyma vs vessels.
6. Structures to Identify
-
Pancreatic duct (Duct of Wirsung) – central echogenic line, normal ≤2 mm.
-
CBD – posterior to head of pancreas.
-
Splenic vein – runs along posterior surface of body.
-
Portal vein confluence – posterior to neck.
-
Landmark vessels help localize each region.
7. Clinical Importance
-
Detect pancreatitis (swelling, peripancreatic fluid).
-
Masses/tumors (especially head of pancreas → obstructive jaundice).
-
Pancreatic duct dilation (chronic pancreatitis, malignancy).
-
Vascular involvement in pancreatic cancer (SMA, SMV encasement).
Appendix Ultrasound – Probe Positioning & Notes
1. Patient Preparation
-
No fasting required, but empty bladder may help visualization.
-
Patient in supine position, right lower quadrant exposed.
-
If bowel gas obstructs view → gentle graded compression.
2. Probe Selection
-
Linear high-frequency transducer (7–12 MHz) → best for superficial appendix.
-
In obese adults → curvilinear 3–5 MHz may be needed for deeper visualization.
3. Probe Positioning & Technique
A. Initial Landmarks
-
Place probe at McBurney’s point (one-third distance from ASIS → umbilicus).
-
Orientation marker toward patient’s head for longitudinal view, or right for transverse view.
B. Graded Compression Technique (Puylaert’s method)
-
Apply steady pressure with probe → displaces bowel gas and brings appendix into view.
-
Normal bowel loops collapse with compression, inflamed appendix does not.
C. Identifying the Appendix
-
Blind-ended tubular structure arising from cecum.
-
Usually located:
-
Retrocecal (most common).
-
Pelvic, subcecal, or post-ileal variants.
-
-
Key landmark: Ileocecal junction (terminal ileum entering cecum) → appendix usually nearby.
4. Ultrasound Findings
Normal Appendix
-
Diameter 6 mm.
-
Compressible with probe.
-
Thin wall, no periappendiceal fat stranding.
Acute Appendicitis
-
Non-compressible tubular structure, blind-ended.
-
Diameter > 6 mm.
-
Wall thickening & hyperemia on Doppler.
-
Possible appendicolith (echogenic focus with shadowing).
-
Surrounding fat → echogenic (“dirty fat sign”).
-
Periappendiceal fluid collection (if perforated).
5. Scanning Tips
-
Use graded compression systematically in RLQ.
-
Roll patient slightly left lateral → appendix shifts into view.
-
Ask patient to point to site of maximum tenderness (correlates with appendix location).
-
Use Doppler for increased vascularity in inflamed appendix.
6. Clinical Relevance
-
First-line imaging in children & pregnant women (to avoid CT radiation).
-
Helps diagnose:
-
Acute appendicitis.
-
Appendiceal mass/abscess.
-
Differentials (mesenteric adenitis, ovarian torsion, ectopic pregnancy, Crohn’s disease).
-
✅ Summary:
-
Use high-frequency linear probe.
-
Start at McBurney’s point, use graded compression.
-
Look for non-compressible, >6 mm blind-ended tubular structure from cecum
Peritonitis – Clinical & Imaging Notes
1. Definition
-
Peritonitis = Inflammation of the peritoneum (lining of abdominal cavity and organs).
-
Can be localized (around appendix, perforated ulcer, etc.) or generalized (diffuse peritoneal involvement).
2. Causes (Etiology)
🔹 Primary (Spontaneous) Peritonitis
-
Occurs without GI perforation.
-
Common in:
-
Cirrhosis with ascites → spontaneous bacterial peritonitis (SBP).
-
Nephrotic syndrome.
-
🔹 Secondary Peritonitis
-
Most common form.
-
Due to perforation or infection spread:
-
Perforated appendix, peptic ulcer, diverticulum.
-
Trauma to bowel.
-
Postoperative anastomotic leak.
-
🔹 Tertiary Peritonitis
-
Persistent/recurrent infection after initial treatment.
-
Often in critically ill or immunocompromised patients.
3. Pathophysiology
-
Bacteria/irritants enter peritoneal cavity.
-
Triggers inflammatory cascade → exudate, fibrin deposition, ileus.
-
Can progress to sepsis, shock, multi-organ failure if untreated.
4. Clinical Features
-
Acute abdominal pain (sudden, severe, diffuse).
-
Rebound tenderness & guarding (rigid “board-like” abdomen).
-
Fever, tachycardia, hypotension.
-
Nausea, vomiting, absent bowel sounds (ileus).
-
In severe cases → septic shock.
5. Investigations
🔹 Laboratory
-
CBC: Leukocytosis.
-
CRP, ESR ↑.
-
Blood cultures if sepsis suspected.
-
In ascites: Diagnostic paracentesis (PMN count > 250/mm³ = SBP).
🔹 Imaging
-
X-ray Abdomen: Free air under diaphragm (if perforation).
-
Ultrasound (FAST / Abdominal US):
-
Free fluid (echo-free or complex with debris).
-
Loculated collections/abscess.
-
Inflamed bowel/appendix as source.
-
-
CT Scan (Gold Standard):
-
Identifies source (perforation, abscess, appendicitis).
-
Best for guiding surgery or drainage.
-
6. Ultrasound Signs of Peritonitis
-
Free fluid in peritoneal cavity (simple or complex).
-
Echogenic floating debris = pus.
-
Thickened, matted bowel loops.
-
Abscess formation.
-
In SBP: Ascitic fluid → low-level internal echoes.
7. Management
🔹 Initial
-
IV fluids, electrolyte correction.
-
Broad-spectrum IV antibiotics (cover Gram- & anaerobes).
-
NG tube for decompression.
🔹 Definitive
-
Surgery (laparotomy/laparoscopy) if perforation, gangrenous appendix, perforated ulcer, etc.
-
Percutaneous drainage for abscess (image-guided).
-
SBP → antibiotics (e.g., cefotaxime), no surgery unless complicated.
8. Complications
-
Sepsis, septic shock.
-
Intra-abdominal abscess.
-
Adhesions → bowel obstruction.
-
Multi-organ failure.
9. Key Exam Points
-
Generalized guarding + rebound tenderness = hallmark.
-
Free air under diaphragm = perforation.
-
SBP common in cirrhotics with ascites.
✅ Summary:
-
Peritonitis = acute surgical emergency.
-
Causes: spontaneous (SBP), secondary (perforation), tertiary (persistent infection).
-
Diagnosis: clinical + US/CT.
-
Treatment: resuscitation + antibiotics + source control (surgery/drainage).
Kidney Ultrasound – Probe Positioning & Clinical Notes
1. Patient Preparation
-
Usually no preparation needed.
-
Full bladder sometimes required when evaluating ureters or bladder outflow.
-
Position: supine or lateral decubitus. Deep inspiration may help kidneys descend below rib cage.
2. Probe Selection
-
Curvilinear transducer (3–5 MHz) → standard for adults.
-
Higher-frequency (7–10 MHz) → children, thin patients for higher resolution.
3. Probe Positioning & Scanning Technique
A. Right Kidney
-
Place probe in right upper quadrant, mid-axillary line.
-
Best acoustic window: liver (acts as an excellent window).
-
Orientation:
-
Longitudinal view → marker toward head.
-
Transverse view → marker toward patient’s right.
-
B. Left Kidney
-
Place probe in left upper quadrant, posterior axillary line.
-
Acoustic window: spleen (less effective than liver → sometimes harder to visualize).
-
May need posterior/lateral approach due to stomach & bowel gas.
4. Normal Sonographic Anatomy
-
Size: 9–12 cm (adults).
-
Shape: Bean-shaped.
-
Cortex: Hypoechoic (darker) relative to liver/spleen.
-
Medulla: Hypoechoic triangular pyramids.
-
Sinus: Echogenic due to fat, vessels, and collecting system.
-
Hilum: Central — renal artery, vein, pelvis.
5. Key Views
-
Longitudinal (sagittal): Kidney length measurement, corticomedullary differentiation.
-
Transverse (axial): Hilum, renal pelvis, and vessels.
-
Oblique sweeps: Ensure full coverage from superior to inferior pole.
6. Ultrasound Findings in Pathology
🔹 Hydronephrosis
-
Dilated collecting system → anechoic areas within sinus.
-
Grades: mild (pelvis only) → severe (pelvis + calyces + thinning cortex).
🔹 Renal Stones
-
Echogenic focus with posterior acoustic shadowing.
-
May see twinkling artifact on Doppler.
🔹 Renal Cysts
-
Well-defined, anechoic, thin wall, posterior acoustic enhancement.
🔹 Chronic Kidney Disease (CKD)
-
Small echogenic kidneys.
-
Cortical thinning, loss of corticomedullary differentiation.
🔹 Acute Kidney Injury (AKI)
-
Normal size or enlarged.
-
Cortical echogenicity ↑ in some causes.
🔹 Masses (e.g., RCC)
-
Solid hypoechoic/hyperechoic mass.
-
Irregular, may distort renal outline.
7. Clinical Applications
-
Evaluate hydronephrosis & obstruction.
-
Assess renal size (CKD vs AKI).
-
Detect renal stones, cysts, tumors.
-
Guide biopsies & drainage procedures.
-
Part of FAST scan (look for perirenal free fluid in trauma).
✅ Summary:
-
Right kidney → best seen via liver window.
-
Left kidney → via spleen or posterior approach.
-
Evaluate: cortex, medulla, sinus, hilum.
-
Pathologies: hydronephrosis, stones, cysts, CKD, tumors.
Abdominal Doppler Sonography (Doppler Ultrasound of Abdominal Vessels)
1. Introduction
-
Doppler ultrasound evaluates blood flow in abdominal vessels using the Doppler effect.
-
It assesses direction, velocity, and turbulence of blood flow.
-
Non-invasive, radiation-free, real-time technique.
-
Essential in diagnosing vascular diseases, abdominal organ perfusion, and portal hypertension.
2. Physics Principle
-
Doppler Effect: Change in frequency of ultrasound waves due to movement of red blood cells.
-
Modes:
-
Color Doppler → Displays flow direction & relative velocity (blue = away, red = towards probe).
-
Power Doppler → More sensitive, shows flow intensity (good for low-flow vessels).
-
Spectral Doppler → Provides waveform & velocity quantification.
-
3. Major Vessels Assessed
-
Aorta
-
Location: Midline retroperitoneum.
-
Evaluated for aneurysm, stenosis, dissection.
-
Doppler waveform: High-resistance triphasic (systolic peak + early diastolic reversal + late diastolic forward flow).
-
-
Inferior Vena Cava (IVC)
-
Thin-walled, collapsible.
-
Assessed for thrombosis, compression, right atrial pressure estimation.
-
-
Renal Arteries & Veins
-
Detect renal artery stenosis (RAS) → cause of secondary hypertension.
-
Resistive Index (RI) = (Peak systolic velocity – End diastolic velocity) ÷ Peak systolic velocity.
-
Normal: 0.6 – 0.7
-
0.8 → Suggests parenchymal disease.
-
-
-
Hepatic Artery
-
Assessed in liver transplant patients (patency, stenosis, thrombosis).
-
Normal: Low resistance waveform with continuous forward diastolic flow.
-
-
Portal Vein
-
Normal: Hepatopetal (towards liver), monophasic, low velocity (20–40 cm/s).
-
Hepatofugal flow (away from liver) → Portal hypertension, cirrhosis, shunts.
-
-
Hepatic Veins
-
Show triphasic waveform (due to cardiac influence).
-
Loss of triphasicity → Cirrhosis, right heart failure.
-
-
Mesenteric Arteries (SMA, IMA, Celiac)
-
Evaluated for mesenteric ischemia.
-
SMA:
-
Fasting: High resistance.
-
Postprandial: Low resistance (due to increased bowel demand).
-
-
275 cm/s peak systolic velocity → >70% stenosis.
-
4. Indications
-
Portal hypertension (e.g., cirrhosis, Budd-Chiari).
-
Renal artery stenosis (secondary hypertension).
-
Abdominal aortic aneurysm (AAA).
-
Mesenteric ischemia.
-
Liver transplant vascular complications.
-
Thrombosis (portal, hepatic, IVC, renal vein).
-
Tumor vascularity (HCC, renal cell carcinoma).
5. Advantages
-
Non-invasive, no radiation.
-
Portable & repeatable.
-
Real-time hemodynamic assessment.
6. Limitations
-
Operator dependent.
-
Limited in obese patients or those with bowel gas.
-
Deep or small vessels may be difficult to visualize.
7. Clinical Correlations
-
Cirrhosis → Hepatofugal portal flow, monophasic hepatic veins.
-
Budd-Chiari Syndrome → Absent/reversed hepatic vein flow.
-
Renal artery stenosis → High peak systolic velocity (>180 cm/s), tardus-parvus intrarenal waveform.
-
Aneurysm → Loss of triphasic aortic flow, turbulence.
✅ Key Takeaway: Abdominal Doppler is crucial in evaluating vascular pathology (stenosis, thrombosis, hypertension, transplant complications) and helps guide management decisions.
Pelvic Imaging with Ultrasound (POCUS)
1. General Principles
-
Probe Selection
-
Curvilinear probe (2–5 MHz): Deep pelvic imaging (abdominal approach).
-
Phased array probe (2–5 MHz): Alternative for deeper penetration (useful in obese patients).
-
Linear probe (5–10 MHz): For superficial structures (scrotum, penile, bladder wall, pelvic floor).
-
Endocavitary probe (5–8 MHz): Transvaginal (female) or transrectal (male/female).
-
-
Patient Preparation
-
Bladder full → enhances visualization of uterus, adnexa (female) & prostate (male, suprapubic).
-
Bladder empty → useful in evaluating retention, bladder wall, pelvic floor.
-
2. Female Pelvis
A. Transabdominal Approach
-
Patient: Supine, bladder full.
-
Probe: Curvilinear, suprapubic.
-
Probe Positioning:
-
Longitudinal (sagittal): Probe marker toward patient’s head.
-
Transverse: Probe marker to patient’s right.
-
-
Structures Seen: Uterus (orientation, size, endometrium), adnexa (ovaries, cysts, masses), free fluid in pouch of Douglas.
B. Transvaginal Approach (if available & indicated)
-
Patient: Lithotomy, bladder empty.
-
Probe: Endocavitary with cover & gel.
-
Probe Positioning:
-
Insert with marker anterior (towards ceiling).
-
Rotate to obtain sagittal and coronal views of uterus & adnexa.
-
-
Structures Seen: Higher resolution of uterus, endometrium, ovaries, adnexa, early pregnancy.
3. Male Pelvis
A. Transabdominal (Bladder & Prostate)
-
Patient: Supine, bladder full.
-
Probe: Curvilinear, suprapubic.
-
Probe Positioning:
-
Longitudinal (sagittal): Marker toward head → visualize bladder, prostate just inferior.
-
Transverse: Marker to right → assess bladder volume, symmetry, masses, prostate enlargement.
-
B. Transrectal (Prostate, Seminal Vesicles)
-
Patient: Left lateral decubitus.
-
Probe: Endocavitary probe with cover.
-
Probe Positioning: Insert probe with marker anterior. Sweep sagittal and coronal planes.
-
Structures Seen: Prostate size, nodules, seminal vesicles, perirectal space.
C. Scrotal Imaging
-
Patient: Supine, scrotum supported with towel.
-
Probe: High-frequency linear.
-
Probe Positioning:
-
Longitudinal & transverse scans of each testis and epididymis.
-
Use color Doppler for torsion/varicocele assessment.
-
4. Key Clinical Uses in POCUS
-
Female:
-
Rule out ectopic pregnancy (identify intrauterine pregnancy, free fluid).
-
Ovarian torsion (enlarged ovary, absent flow on Doppler).
-
Uterine fibroids, cysts, pelvic masses.
-
Retained products of conception.
-
-
Male:
-
Prostate enlargement (urinary retention).
-
Bladder volume measurement (urinary obstruction).
-
Scrotal pain (torsion vs epididymitis).
-
Hematoma, trauma assessment.
-
✅ Tip for POCUS learners:
-
Always start with transverse and sagittal sweeps.
-
Adjust depth & gain to center the organ of interest.
-
Use Doppler (Color/Power) when vascularity is important (torsion, tumors, ectopic).
Testicular Ultrasound (POCUS)
1. Probe Selection
-
High-frequency linear probe (7–15 MHz):
-
Best for superficial scrotal contents.
-
Provides excellent resolution for testis, epididymis, spermatic cord, and vascularity.
-
2. Patient Positioning
-
Supine with thighs slightly abducted.
-
Place a rolled towel under the scrotum for support and elevation.
-
Penis placed on abdomen and covered with a towel for modesty.
-
Use warm gel (cold gel may cause cremasteric contraction).
3. Probe Positioning & Scanning Technique
A. Transverse (Axial) View
-
Place probe across scrotum (marker to patient’s right).
-
Visualize both testes side by side for comparison of echogenicity and size.
-
Evaluate epididymis, tunica vaginalis, and check for hydrocele/hematocele.
B. Longitudinal (Sagittal) View
-
Rotate probe 90° (marker toward patient’s head).
-
Scan each testis individually from medial → lateral.
-
Assess homogeneity, echotexture, and focal lesions.
C. Color Doppler / Power Doppler
-
Apply to evaluate vascularity:
-
Normal: Symmetric arterial & venous flow in both testes.
-
Torsion: Absent or markedly reduced flow in affected testis.
-
Epididymitis/Orchitis: Increased flow (hyperemia).
-
4. Structures to Identify
-
Testis: Homogeneous, medium-level echotexture, smooth contour.
-
Mediastinum testis: Linear echogenic band running longitudinally.
-
Epididymis:
-
Head (superior, hypoechoic/isoechoic to testis).
-
Body & tail (posterior/inferior).
-
-
Tunica vaginalis: Check for hydrocele/hematocele.
-
Spermatic cord: Follow proximally; use Doppler for varicocele (venous dilation with Valsalva).
5. Clinical Uses in POCUS
-
Acute scrotum:
-
Torsion: Enlarged hypoechoic testis, absent Doppler flow.
-
Epididymitis/orchitis: Enlarged epididymis/testis, ↑ flow on Doppler.
-
-
Hydrocele: Anechoic fluid around testis.
-
Hematocele: Complex echogenic fluid (trauma).
-
Varicocele: Dilated veins (>2 mm), flow ↑ with Valsalva.
-
Trauma: Testicular rupture (disruption of tunica albuginea, heterogeneous parenchyma).
-
Tumors: Hypoechoic or mixed echogenicity masses (require further imaging/labs).
✅ Quick Step Summary:
-
Start transverse with both testes (compare size & echotexture).
-
Sweep sagittally each testis.
-
Evaluate epididymis.
-
Use Doppler for blood flow.
-
Assess for fluid collections, cord structures.
Thyroid Ultrasound (POCUS)
1. Probe Selection
-
High-frequency linear probe (7–15 MHz)
-
Best for superficial neck structures (thyroid, lymph nodes, vessels).
-
Provides excellent resolution of parenchyma and nodules.
-
2. Patient Positioning
-
Supine with neck slightly extended.
-
Place a small pillow under the shoulders to stretch and expose the anterior neck.
-
Turn the head slightly away from the side being examined.
-
Apply generous gel (to avoid compression of vessels/nodules).
3. Probe Positioning & Scanning Technique
A. Transverse (Axial) View
-
Place probe just above the suprasternal notch, marker toward patient’s right.
-
Identify:
-
Right and left thyroid lobes.
-
Isthmus (anterior midline).
-
Surrounding structures: trachea (midline), carotid artery & internal jugular vein (lateral).
-
-
Sweep cranio-caudally to cover the entire gland.
B. Longitudinal (Sagittal) View
-
Rotate probe 90° (marker toward patient’s head).
-
Scan each lobe individually from medial → lateral.
-
Evaluate the parenchyma, nodules, and posterior border (important for retrosternal extension).
C. Doppler Evaluation
-
Normal thyroid: Homogeneous vascular pattern.
-
Thyroiditis (e.g., Graves’): Markedly increased vascularity (“thyroid inferno”).
-
Nodules: Assess vascularity (peripheral vs central flow).
4. Structures to Identify
-
Thyroid lobes: Homogeneous, medium-level echogenicity.
-
Isthmus: Thin bridge across trachea.
-
Trachea: Echogenic cartilage rings with posterior shadow.
-
Carotid artery & jugular vein: Lateral landmarks.
-
Parathyroids: Sometimes visible as small hypoechoic nodules posterior to thyroid.
-
Pathology: Nodules, cysts, calcifications, lymphadenopathy.
5. Clinical Uses in POCUS
-
Evaluate thyroid size (goiter, atrophy).
-
Detect nodules (solid, cystic, calcified).
-
Assess thyroiditis (diffuse enlargement, ↑ Doppler flow).
-
Guide procedures: FNAC (fine-needle aspiration), cyst drainage.
-
Detect cervical lymphadenopathy (malignancy/metastasis).
-
Identify retrosternal extension (inferior border of lobes).
✅ Quick Step Summary:
-
Start transverse → evaluate both lobes & isthmus.
-
Sweep cranio-caudally → check whole gland.
-
Rotate longitudinal → assess each lobe in detail.
-
Use Doppler → vascularity & pathology.
-
Compare with normal parenchyma.
Chest Ultrasound (POCUS)
1. Probe Selection
-
Linear probe (7–12 MHz): Best for pleura (sliding, pneumothorax, B-lines).
-
Curvilinear probe (2–5 MHz): Best for deeper views (consolidation, effusion, diaphragm).
-
Phased-array probe (2–5 MHz): Good for cardiac + lung integration.
2. Patient Positioning
-
Supine/semi-recumbent → good for trauma, shock, ICU.
-
Sitting upright → best for pleural effusions, posterior lungs.
-
Arms raised if possible (widens intercostal spaces).
3. Probe Positioning & Scanning Technique
A. Anterior Chest (Pneumothorax, B-lines)
-
Place probe longitudinally in an intercostal space, marker toward head.
-
Identify:
-
Ribs (acoustic shadows).
-
Pleural line (between rib shadows).
-
-
Look for:
-
Lung sliding (normal).
-
Absent sliding + barcode sign (pneumothorax).
-
B-lines (vertical artifacts → edema, fibrosis).
-
B. Lateral Chest (Pleural Effusion, Consolidation)
-
Probe placed in mid-axillary line at diaphragm level.
-
Use curvilinear or phased probe.
-
Identify:
-
Diaphragm (bright echogenic line).
-
Liver (right) / spleen (left) beneath diaphragm.
-
Anechoic space above diaphragm = pleural effusion.
-
Consolidated lung may appear tissue-like with air bronchograms.
-
C. Posterior Chest (Effusions, Consolidation)
-
Best in sitting patient.
-
Scan between scapula and spine, down to costophrenic angles.
-
Large effusions gravitate posteriorly.
D. Cardiac Windows (for integrated chest/heart exam)
-
Parasternal long/short, apical, subxiphoid views with phased probe.
-
Assesses pericardial effusion, LV function, RV strain.
4. Key Clinical Findings
-
Pneumothorax:
-
Absent lung sliding.
-
Absent B-lines.
-
M-mode: “Barcode sign.”
-
-
Pleural Effusion:
-
Anechoic/complex fluid above diaphragm.
-
Spine sign (vertebral column visible above diaphragm).
-
-
Pulmonary Edema:
-
Multiple diffuse B-lines.
-
-
Pneumonia/Consolidation:
-
Hepatization of lung.
-
Dynamic air bronchograms.
-
-
ARDS:
-
Patchy B-lines with spared areas.
-
✅ Quick Step Summary for Chest POCUS:
-
Anterior (linear probe): Sliding? B-lines? Pneumothorax?
-
Lateral (curvilinear probe): Effusion? Consolidation?
-
Posterior (if sitting): Effusion & dependent consolidation.
-
Integrate with Cardiac POCUS: Volume status, pericardial effusion, RV strain.
-
-
-
-
-
-
-
-
1.14 Conclusion
POCUS is revolutionizing bedside diagnostics by providing real-time insights that enhance clinical efficiency, especially in underserved and rural regions. Mastery begins with understanding the physics and basics of ultrasound, progressing through anatomy, scanning technique, and clinical correlation.

